
This is a shot from the back of the machine. I was going to put it up against a wall, but I have needed to get around to the back quite a lot. It would be a good idea to think about this when setting up your work space.
So what is the problem with the motor? Good question. The problem is very intermittent but when I turn the motor on it makes this noise that sounds like it will lead to some sort of catastrophic failure and vibrates the motor like crazy. You will know it if you hear it. Sometimes I slap the off button, then turn it on and it runs fine. Other times it will not stop making the noise and I go home for the night. Sometimes after is sits, the noise goes away and sometimes it doesn't.
I called Shoptask and JT said it sounded like the motor points were sticking. I have read about this in other posts as well. So, lets play with electricity.
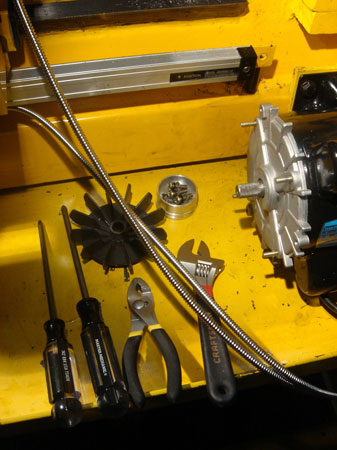
So JT tells me, "you can use a couple of screwdrivers to work the fan off the spindle." Easy right? Let's just say that my shoulder and back muscles were sore the next day. It was by far the hardest part and took me around 20 minutes to get the fan off the first time.
These shots are from my third disassembly on the late motor.
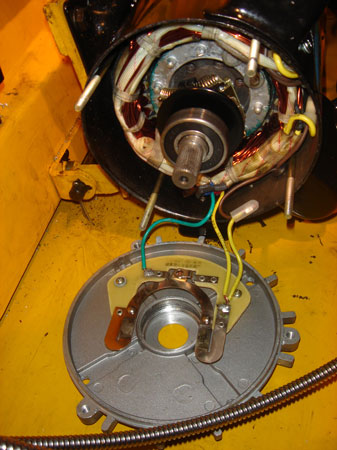
I used a soft mallet and a flat screwdriver to tap the aluminum end bell off the motor. Be very careful you don't break off any of the tabs and work your way around. You need to hammer it off because the bearing is press fit into the bell.
At this point I checked all the wires, solders and the centrifugal switch and they were fine. The culprit indeed seemed to be the motor points.
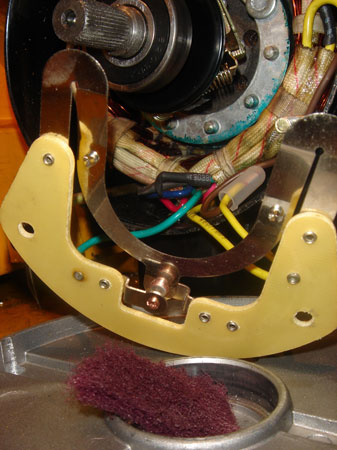
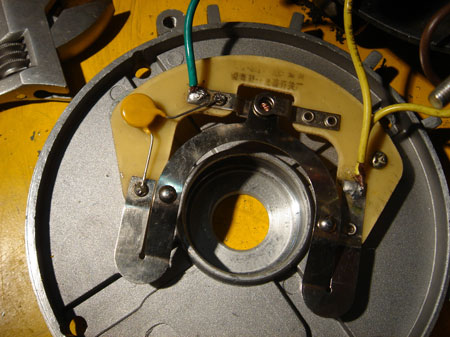
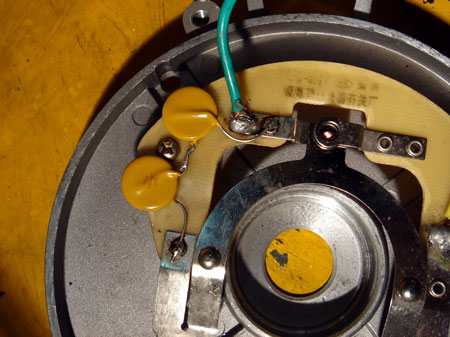
Here is a close up of the bracket and the abrasive pad I used to buff out the points which were pitted from electrical arcing. I slid the pad in between the points, pinched them together with my fingers and pulled the pad out. Rinse and repeat till the pitting is gone.
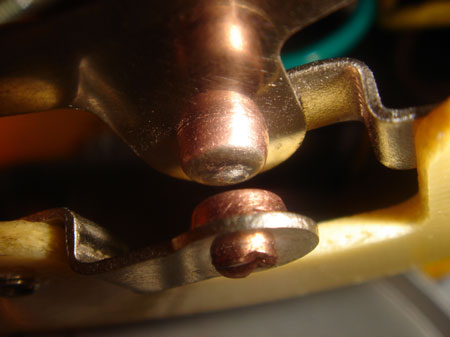
When the motor is off, the centrifugal switch pushes against the U shaped bracket (from the opposite side we are looking at) and causes the two copper plated points to touch. I'm guessing this places the start capacitors in the circuit.
When the motor is turned on, the capacitors help spin the motor up and then the centrifugal switch retracts...breaking the contact of the points and allowing the motor to run freely.
As I understand a "sticking point" must mean the two contacts are temporarily welded together and don't release when the centrifugal switch retracts.
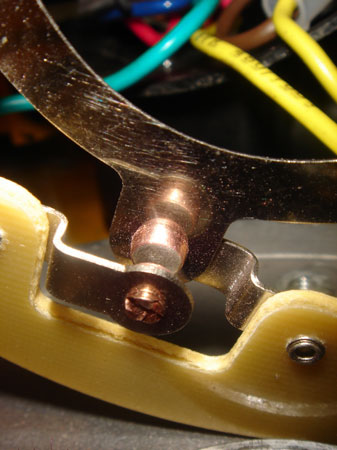
A close up of the points. What I'm thinking at this stage is the arcing is caused by the points hovering close to each other, but not having solid contact.
I already tried buffing the points once, but the noise came back in about two days of use. So, on this third try I was determined to bend some stuff.
I gently tweaked the U shaped bracket to make it stick out further on the side where it contacts the centrifugal switch. This would effectively increase the pressure on the points and provide cleaner contact and more rapid disengagement.
So far this has worked fine. Very pleased with myself I went on to drilling some holes with the mill...but...now the mill motor was freaking out. I used the same operation on the mill motor and now that seems to be in order as well.
We'll have to wait and see if it keeps on working though.
Yep, nope. My lathe motor went nuts again today after working for about 4 hours. It ran great, except when I turned the motor on the last time Zrrrrrrrrrrrp. I've decided that's how I will spell the noise.
It didn't go away by itself, I tried waiting a few minutes and then turning the motor on again but no dice. Well, time for my 4th tear down I guess. This is getting a bit silly though.
I'm going to get some emory board to do the points this time. I just used an abrasive pad I had laying around last time, but the finish comes out a bit rough. If anyone has any suggestions on this one I'd be happy to hear them. Good thing the machine is made out of metal, otherwise I'd consider punching it at this point.
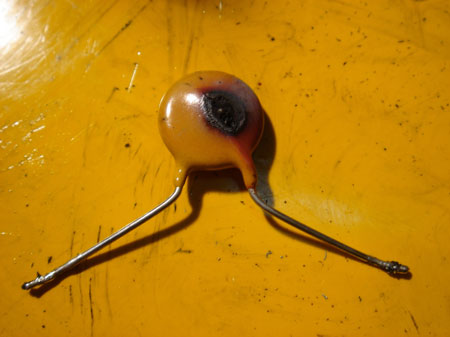
Well, here is the culprit, the notorious "pitted point."
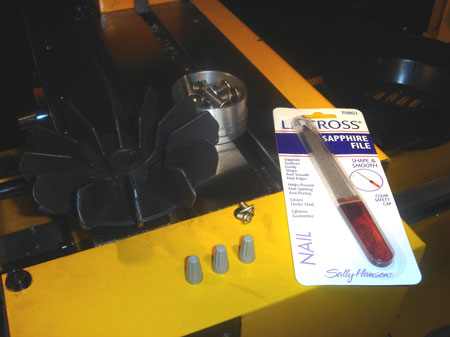
I went and bought a little nail file to get at the points. They are a bit hard to reach and I thought this would give me better access.
I also got some little twist on electrical caps. Figured I'd replace the crimp on ones while I had the motor open this time. I only found one that seemed questionable. The other definitely did not need to be replaced, but I did it anyway.
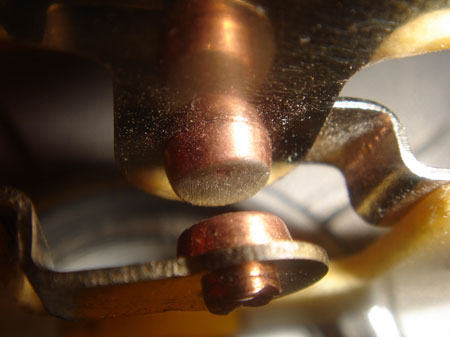
This is after I used the file to clean them up.
Shoptask suggested I put some washers between the bell and the mounting plate to put the assembly closer to the centrifugal switch to get more positive switching.
I also took the liberty to bend the U shaped bit some more. This was not a very good idea...the motor didn't make the noise but it rotated verrrry slowly.
I pulled the motor apart yet again and bent the U shaped piece back to normal. This time the motor seemed to fire up okay. Haven't had time to run it yet.
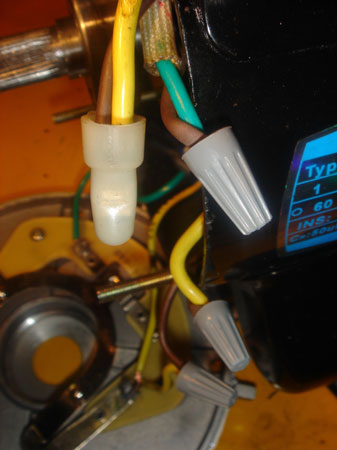
The new caps are actually a bit smaller than the old ones and fit more easily inside the motor housing.
So, a nice fellow stopped by the site and had a suggestion for my motor woes. He's a bit of an electronics expert and suggested that the "resistor across the capacitor" fix was, in fact, not a very good approach.
While it may seem like it improves the pitted points, he said that it effectively turned my fancy new US made capacitors into leaky, bad US made capacitors and would eventually ruin them.
What is this thing in the photo? It's a MOV of course. Don't worry (if you are worried) I didn't know what a MOV was either. Metal Oxide Varistors are used for controlling transient voltages...more or less.
What should happen...if I have the right specification MOV...is it will absorb some of the over-voltage start up energy and "quench" the arc, which should reduce the tendency to pit...on to the results!
Huh...I was hoping for something...different. I'd say this MOV was too small. It did make a nice plume of acrid smoke however, so I've got that going for me.
Now I know someone is going to look back at what I did in the photo before this and say, or at least think, "Nice job dummy, you soldered that MOV across the points and have forced the start circuit to stay closed!"
This is what I was thinking when I went back to look at the smoky insides of my motor. However, "The MOV looks like an OPEN CIRCUIT, (as if it is a capacitor) to all voltages below it's threshold voltage, after that it acts as a lower impedance, effectively damping the spikes."
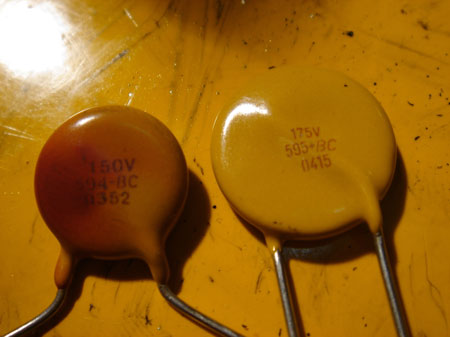
Well, it looks like I need a bigger MOV. You can see the less toasted side of the first one I tried. I haven't wired the next one up, because at the time I wasn't sure if I had wired it wrong or it was just too small.
Turns out it was too small, but my motor has been running okay so I won't install the bigger one till it quits. If that doesn't work I'm going to try a couple in series and really mess things up. Stay tuned....
By the way, if anyone is still counting, I've opened my lathe motor 11 (yes that is eleven) times.
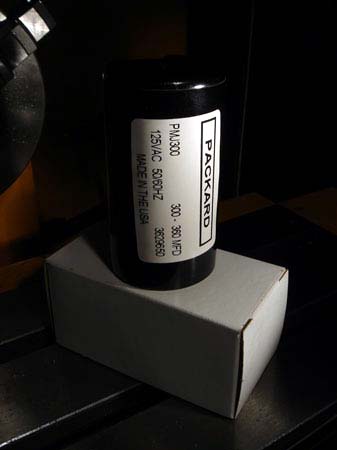
This is the replacement capacitor I bought for the machine. I had a pretty hard time finding one locally so this one is too big to fit into the housing on the motor.
I've been trying to come up with a good solution to make my own housing.
Here is a big surprise for everyone. My motor conked out last night. I tore the thing down like a veritable motor expert and buffed the contacts with some 600 grit sand paper I came across in the last few weeks.
I also took the opportunity to install some new MOV's. These 175v units are wired in series...and was a total guess to whether they would work or not. Based on my previous experience I was expecting smoke at best.
To my utter amazement the motor ran...and ran...and ran...and just kept on running...like it was a motor. Maybe I'm doing some other kind of damage. This isn't definitive quite yet, but if I don't hear and zrrrrrrrrp noises over the next few weeks I'll post the part numbers and specs for the MOV's so you folks at home can have a motor that works too!